

Humphry
0
- Joined
- Nov 23, 2010
- Messages
- 134
- Points
- 0
Hello from South Africa!
Inspired by so many other CPU cooler builds, I decided my first diy build would be a lab laser. It's not professional but is IS cheap, durable and impossible to overheat. What more could I ask for?
I am a total newbie. Here's how I did it,, NOOB STYLE!!!:
What you need:
-Ca$$i0 A140 diode: $40 - DTR and others sell these on lpf
-Aixiz module: $4 - HighTechDealZ - Aixiz Laser Module - Blank
-Glass aixiz lens: $8 - ebay or look around on lpf
-Heatsink: $2
-Other components.. a few more $ - local electronics store. View driver link.
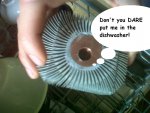
Heatsink & drilling:
Went to a e-scrapyard and got a cpu heatsink. 2$.
Tip: You will save big munneh if you get scrap value (without functioning fan) vs 'secondhand' value.
NOTE: Copper-core ones are very difficult to drill - I think because the copper expands when it gets hot, making the hole too small for your drill bit which gets stuck.
I would advise you to use aluminium unless you want to spend ages, dunking in cold water and with lots of stuck bits.
Remember to use oil and work your way up to 12mm GRADUALLY. This actually saves time because you do not have to wait for the copper to cool down before continuing. I used: 2mm, 5mm, 7mm, 10mm, 11.5mm (i think this really helped to get a perfect finish) and finally 12mm. No fancy reamer, just care, love and affection. And a slow drill speed
Tip: Put in dishwasher to get rid of all drill oil.

Installing module:
After soldering my pins and wires (pinout for a 445 diode here: http://www.google.co.za/imgres?q=140+pinout&um=1&hl=en&sa=N&tbm=isch&tbnid=h8RYZ79psjrT8M:&imgrefurl=http://laserpointerforums.com/f65/140-diode-pin-out-diagram-62237.html&docid=w374k7Xwf1rwRM&w=320&h=278&ei=AiR3TpWSB6rT0QXsgIWdCA&zoom=1&iact=hc&vpx=636&vpy=304&dur=3278&hovh=209&hovw=241&tx=166&ty=102&page=2&tbnh=153&tbnw=140&start=13&ndsp=15&ved=1t:429,r:13,s:13&biw=1066&bih=725)
Tip: Strip and loop an old wire at one end and put it around your wrist. Strip other end and tie to any hunk of metal. You have just made an antistatic wristband to protect your diode from static. Simple, cheap and effective.
I then pushed diode into aixiz module and then pushed that into my drilled heatsink... Doing things n00b-style I did not make a set screw. I just used some thermal adhesive from Dealextreme and pushed it in there. Maybe I will regret that later.
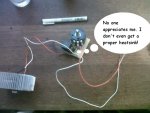
The driver:
The lm317 driver was simple to make. At 12v the driver heated up quite a bit - so remember to also let your driver know that you love it just as much by fixing it to an ugly sawn-off piece of aluminium. If you used a pot to adjust the current like I did - make sure it is rated above 1.5W. Here's a simple schematic. http://www.rog8811.com/laserdriver.htm]Laser driver - It can be done
Tip: Touch the ends of the driver wires together while power is OFF before soldering it to your diode. I do not think this is neccessary for lm317 as there are no capacitors in series but it is a good habit for future that could save you a diode.
-Here is how to work out resistor values for your driver LM317 Current Calculator - Electric Circuit
-And i needed to modify my pot for fine adjustment by putting a resistor in parallell, this is my favorite link help with parallell resistance Online Parallel Resistor Calculator

I soldered the wires to the driver and voila. Although I didn't bother, if you really want a nice-looking unit, install driver in a project box (don't forget to drill holes for ventilation!!)
Be careful not to pull those diode wires or you might end up with a very lonely diode pin.
Just an idea- To prevent this you could try drilling a teeny hole at the back and screwing in a bolt with a washer and tighten that with the wires underneath to prevent accidental pulling. I didn't bother.
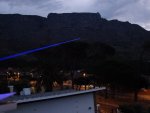
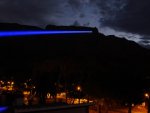
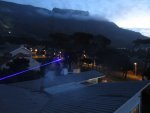
Beamshots:
Anyone ever been to Cape Town?

Table Mountain


Fine, there may have been a little smoke from the neighbours chimney

Ah.. how surreal.. the mother city

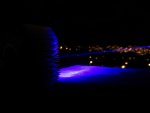
This one is hitting a tree, I know it doesnt look like it!!! Trees can be sneaky.

Thank you fore looking and I hope I helped someone. :beer:
Feel free to ask any questions or criticize.
.
Inspired by so many other CPU cooler builds, I decided my first diy build would be a lab laser. It's not professional but is IS cheap, durable and impossible to overheat. What more could I ask for?
I am a total newbie. Here's how I did it,, NOOB STYLE!!!:
What you need:
-Ca$$i0 A140 diode: $40 - DTR and others sell these on lpf
-Aixiz module: $4 - HighTechDealZ - Aixiz Laser Module - Blank
-Glass aixiz lens: $8 - ebay or look around on lpf
-Heatsink: $2
-Other components.. a few more $ - local electronics store. View driver link.
Heatsink & drilling:
Went to a e-scrapyard and got a cpu heatsink. 2$.
Tip: You will save big munneh if you get scrap value (without functioning fan) vs 'secondhand' value.
NOTE: Copper-core ones are very difficult to drill - I think because the copper expands when it gets hot, making the hole too small for your drill bit which gets stuck.
I would advise you to use aluminium unless you want to spend ages, dunking in cold water and with lots of stuck bits.
Remember to use oil and work your way up to 12mm GRADUALLY. This actually saves time because you do not have to wait for the copper to cool down before continuing. I used: 2mm, 5mm, 7mm, 10mm, 11.5mm (i think this really helped to get a perfect finish) and finally 12mm. No fancy reamer, just care, love and affection. And a slow drill speed
Tip: Put in dishwasher to get rid of all drill oil.
Installing module:
After soldering my pins and wires (pinout for a 445 diode here: http://www.google.co.za/imgres?q=140+pinout&um=1&hl=en&sa=N&tbm=isch&tbnid=h8RYZ79psjrT8M:&imgrefurl=http://laserpointerforums.com/f65/140-diode-pin-out-diagram-62237.html&docid=w374k7Xwf1rwRM&w=320&h=278&ei=AiR3TpWSB6rT0QXsgIWdCA&zoom=1&iact=hc&vpx=636&vpy=304&dur=3278&hovh=209&hovw=241&tx=166&ty=102&page=2&tbnh=153&tbnw=140&start=13&ndsp=15&ved=1t:429,r:13,s:13&biw=1066&bih=725)
Tip: Strip and loop an old wire at one end and put it around your wrist. Strip other end and tie to any hunk of metal. You have just made an antistatic wristband to protect your diode from static. Simple, cheap and effective.
I then pushed diode into aixiz module and then pushed that into my drilled heatsink... Doing things n00b-style I did not make a set screw. I just used some thermal adhesive from Dealextreme and pushed it in there. Maybe I will regret that later.
The driver:
The lm317 driver was simple to make. At 12v the driver heated up quite a bit - so remember to also let your driver know that you love it just as much by fixing it to an ugly sawn-off piece of aluminium. If you used a pot to adjust the current like I did - make sure it is rated above 1.5W. Here's a simple schematic. http://www.rog8811.com/laserdriver.htm]Laser driver - It can be done
Tip: Touch the ends of the driver wires together while power is OFF before soldering it to your diode. I do not think this is neccessary for lm317 as there are no capacitors in series but it is a good habit for future that could save you a diode.
-Here is how to work out resistor values for your driver LM317 Current Calculator - Electric Circuit
-And i needed to modify my pot for fine adjustment by putting a resistor in parallell, this is my favorite link help with parallell resistance Online Parallel Resistor Calculator
I soldered the wires to the driver and voila. Although I didn't bother, if you really want a nice-looking unit, install driver in a project box (don't forget to drill holes for ventilation!!)
Be careful not to pull those diode wires or you might end up with a very lonely diode pin.
Just an idea- To prevent this you could try drilling a teeny hole at the back and screwing in a bolt with a washer and tighten that with the wires underneath to prevent accidental pulling. I didn't bother.
Beamshots:
Anyone ever been to Cape Town?
Table Mountain
Fine, there may have been a little smoke from the neighbours chimney
Ah.. how surreal.. the mother city
This one is hitting a tree, I know it doesnt look like it!!! Trees can be sneaky.
Thank you fore looking and I hope I helped someone. :beer:
Feel free to ask any questions or criticize.
.
Attachments
-
 DSC07603_800x600.JPG85.8 KB · Views: 1,140
 -
 DSC07625_800x600.JPG64.7 KB · Views: 1,092
 -
 IMG_0476_800x600.jpg71.6 KB · Views: 1,072
 -
 IMG_0494_800x600.jpg49.8 KB · Views: 1,066
 -
 IMG_0512_800x600.jpg36.7 KB · Views: 1,098
 -
 IMG_0518_800x600.jpg52.3 KB · Views: 1,101
 -
 317496_10150295716891086_631771085_8515649_1173373705_n (1)_800x600.jpg60.2 KB · Views: 2,098
 -
 IMG00032-20110910-1401_800x600.jpg73.7 KB · Views: 2,910
Last edited:


")
")

