Welcome to Laser Pointer Forums - discuss green laser pointers, blue laser pointers, and all types of lasers

How to Register on LPF | LPF Donations

1+w pen laser

Joined
Mar 21, 2016
Messages
964
Points
43
Here's a 1+w pen laser, it's focusable and has a 2 min duty cycle. The driver is set at 1.2 amps.

This thing can actually be held like a pen for freehand wood burning etc.
I have exactally $28 in this one
 

Attachments

  • 2016-08-01 13.42.36.jpg
    2016-08-01 13.42.36.jpg
    64.4 KB · Views: 118
  • 2016-08-01 13.42.09.jpg
    2016-08-01 13.42.09.jpg
    59.9 KB · Views: 99
  • 2016-08-01 13.41.46.jpg
    2016-08-01 13.41.46.jpg
    116.2 KB · Views: 106
Last edited:


Hi,
I used one of ABarnetts a-140 445nm diodes and a Chinese boost driver so it has 1 10440 battery and 1 battery spacer. I have some buck (chinese) drivers otw, the next ones I build will use 2 10440's
 
Another one

Also building bdr209's, mits 500's and plt520's in this host. The mits runs the coolist
 

Attachments

  • 2016-08-01 15.21.37.jpg
    2016-08-01 15.21.37.jpg
    109.6 KB · Views: 96
Last edited:
Another one

Also building bdr209's, mits 500's and plt520's in this host. The mits runs the coolist

Cool build, yea i'm also thinking of building a 1W laser. My goal is to put everything in a 90mmx15mm⌀ host. I can get everything to fit, no doubts about that, but the power source is going to be a struggle. Do you think i will reach 500mW or 1W with an A-140 diode using two 10180 batteries in series?
 
Nice little host, good job. I have one of those pen lights on the way. You have given me an idea.
Ed
 
Hi VV,
Nice pen great diode oh if you decide to build a pen with a higher mW and two cells be careful they get really hot fast . i built a bunch of the with one and two cells , careful running two cells remember the switch might be only around 2A's if your lucky. I'm liking that pen i seen them before awesome build my man..

Rich:)
 
Nice pen.
I don't think 2 10180 can supply enough power they will probably sag too much. I think they only have around 70mAh capacity too.
 
Nice pen.
I don't think 2 10180 can supply enough power they will probably sag too much. I think they only have around 70mAh capacity too.

Hi, yea i have to see how i will get that done. Might machine a extension piece which can be screwed on so a higher capacity battery could fit.
 
I'm using efest 10440 340mah
Even 1 w/a boost drive seems pretty powerful, burns like me 2+w 445

Edit:
I'll take some pics and show how I build them when my drivers come in, they're really easy to build.
 
Last edited:
I'm using efest 10440 340mah
Even 1 w/a boost drive seems pretty powerful, burns like me 2+w 445

Edit:
I'll take some pics and show how I build them when my drivers come in, they're really easy to build.
Hi, yea i will machine an extension tube at school to fit the 10440. Nice to hear it burning like your 2+w laser, even on a 10440.

They are easy to build. If you take care, nothing should go wrong. The hardest part is to get everything to fit nicely without shorting anything out, especially when it is a pen build, certainly for a pocket version.
 
Hi all,
Got my drivers, so here's how I build em;

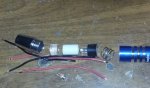
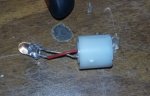
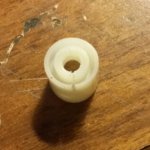
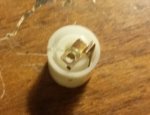
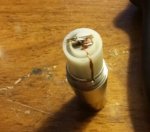
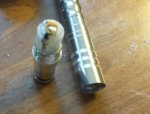
First off, there's two types of these lights, one has a black pill with a spring, (the spring is conical and the best exterior lens spring I've found) and the other a white pill with no spring. The white pill works best as it's the right length. After removing the led and led driver from the pill (3rd pic) turn it upside down and cut a slot on one side for the neutral to make contact with light body (pic4)
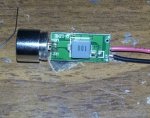
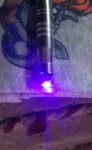
Set driver to desired current. press LD into module. File or cut 1/4" off of light bezel (the interior of bezel is wider at this point and allows threads of module to just slide in.)
Shorten diode leads and solder into driver. Solder battery leads onto driver. Now glue module threads into bezel with thermal adhesive. After adhesive sets up, judge needed battery lead length by holding pill next to back of module assembly. Strip and press neutral wire into slot in pill. Strip and solder positive lead to small piece of sheet copper for + battery contact. (I save small pieces of copper sheeting from DVD drives etc.) Screw module assembly into light. Add batteries and tail cap. That's it.
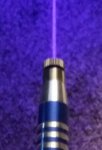
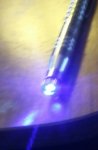
I have 15 mins and $27 dollars in this one.
Thanks for looking
 

Attachments

  • 2016-08-10 16.18.06.jpg
    2016-08-10 16.18.06.jpg
    109.4 KB · Views: 76
  • 2016-08-10 16.17.42.jpg
    2016-08-10 16.17.42.jpg
    133.3 KB · Views: 77
  • 2016-08-10 16.17.21.jpg
    2016-08-10 16.17.21.jpg
    93.4 KB · Views: 91
  • 2016-08-10 16.17.07.jpg
    2016-08-10 16.17.07.jpg
    74.3 KB · Views: 73
  • 2016-08-10 16.16.52.jpg
    2016-08-10 16.16.52.jpg
    64.1 KB · Views: 81
  • 2016-08-10 16.16.39.jpg
    2016-08-10 16.16.39.jpg
    81.7 KB · Views: 90
  • 2016-08-10 16.16.19.jpg
    2016-08-10 16.16.19.jpg
    64.6 KB · Views: 75
Last edited:


Back
Top