

Dundee
New member
- Joined
- Jun 3, 2021
- Messages
- 25
- Points
- 3
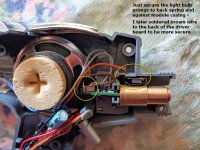
Ok, so I did this 16 years ago back in 2007. I looked everywhere on the internet back then to get some ideas on how to do it but couldn't find a single video or webpage mentioning doing this. I can't really imagine other "Trekkers" playing with lasers that didn't at least think of this. I mean, it's any "Trekkers" instant no-brainer, right? Since I couldn't find anyone with ideas, I took apart my old 90's Playmates Phasers and experimented with them only to realize how ridiculously simple it was to do it. I found it was only a matter of soldering the 2 wires connecting the front light bulb (or securing the metal clips that press against the light bulb) to a short enough laser module (depending on the module you may have to reverse the polarity) and then fitting, aligning and securing the laser module so it would shoot straight out the front hole. This way, it retained all the functions including the phaser sounds. A year later in 2008, YouTuber "Kipkay" uploaded his video of his Blu-ray phaser mod. The thing is, he completely gutted the Playmate phaser, and his phaser had no sound. For some reason, he didn't know he didn't have to gut the thing. Much better to easily integrate the laser module into the sound board. At the time, I could only get laser modules in the 30 to 50 mw range without spending way more money than I wanted to, so it didn't show very well even in a darkened room.
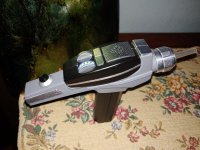
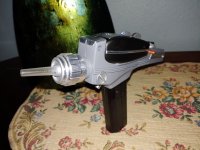
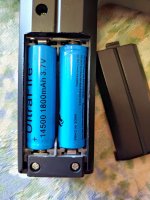
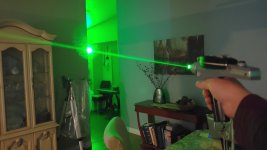
Fast forward 16 years later to last week, I was playing with my ST toys again and found a couple of old 200mw modules I forgot I had, that I got years ago from "O-Like" (what happened to them anyway). And then there's this good Bro on eBay from Florida who makes hollow Acrylic Emitters that are a great replacement for the one that comes with this phaser. Now, I know there's excellent metal parts you can buy for these, (mainly for my Art Asylum version) but I figured, instead of spending more money and doing crazy cutting, drilling and gutting mods, I just used my Playmates version and got a roll of metal chrome tape. The kind HVAC guys use to wrap heating/air conditioning flues and pipe. Cut some pieces and strips to wrap around the nose piece, fins and top sections and it looks great. Doesn't look as good as genuine metal parts but, I mean, it looks better than stock anyway. The one I did in 2007, I had to modify the battery compartment to accept a 9v battery and it worked well but someone here posted in recent years (I can't find the post again, but I do thank that Bro-migo for the idea) about using a single 3.7v 14500 lithium which is nearly identical in size to a AA. So, I simply put two of the 14500's in and they fit and work perfectly to pump about 8v through the thing.
I much prefer the Playmates version over my Art Asylum version as the Playmates have a more solid feel to them and it's way easier to do the mod inside without the need to gut it or cut it much. Also, I much prefer the Green 532nm (520 is a good substitute) module, as mw for mw, it shows the best. I don't need it to burn stuff and I really don't need the thing to cut through the armor of some Klingon warrior, I mean, right? It's really all about the visual combined with the phaser sounds anyway. I've seen a half dozen or so good blokes on YouTube with way better Phasers than mine, but the amount of time, effort and money to get the result is quite a bit. This result took me about 55 bones (laser module and chrome HVAC tape) and less than an hour total, to do everything.
Video I did back in 2007 with 50mw module. (I guess I wasn't paying much attention back then, but I didn't realize I got "Stun" and "Kill" backwards. Lol) :
Video I did last week with 200mw module:
Attachments


Last edited:


